iOS/macOS with SwiftUI
In this section, we'll set up Xcode to build and run the simple counter app we built so far, targeting both iOS and macOS from a single project.
We think that using XcodeGen may be the simplest way to create an Xcode project to build and run a simple Apple app that calls into a shared core.
If you'd rather set up Xcode manually, you can do that, but most of this section will still apply. You just need to add the Swift package dependencies into your project by hand.
When we use Crux to build Apple apps, the Core API bindings are generated in Swift and packaged as an xcframework/Swift package with BoltFFI.
The shared core, which we built in previous chapters, is compiled to a static library and linked into the app binary.
The shared types are generated by Crux as a Swift package, which we can add to our project as a dependency. The Swift code to serialize and deserialize these types across the boundary is also generated by Crux as Swift packages.
flowchart TD
    subgraph shared["shared/ (Rust crate)"]
        app_rs["`app.rs
Event · Effect · ViewModel
#[derive(Facet)]
#[effect(facet_typegen)]`"]

        ffi_rs["`ffi.rs
CoreFfi
#[boltffi::export]`"]
    end

    app_rs --> tg[/"cargo run --bin codegen --language swift"/]
    ffi_rs --> bg[/"boltffi pack apple"/]

    tg -->|typegen| sw_t[Swift types]
    bg -->|bindgen| sw_b[Swift package and xcframework]

    sw_t --> apple["Apple + Swift + SwiftUI"]
    sw_b --> apple
Compile our Rust shared library
When we build our app, we also want to build the Rust core as a static library so that it can be linked into the binary that we're going to ship.
Other than Xcode and the Apple developer tools, we will use BoltFFI to generate a Swift package for our shared library, which we can add in Xcode. Install the matching CLI with
cargo install boltffi_cli --version '=0.25.2' --locked
To run the various steps, we'll also use the Just task runner.
cargo install just
Let's write the Justfile and we can look at what happens. Here are the key tasks (the full Justfile also includes linting, CI and cleanup targets):
# /apple/Justfile

# generates Swift types via codegen binary
typegen:
    cargo run --package shared --bin codegen \
        --features codegen,facet_typegen \
        -- --language swift --output-dir generated

# builds the shared library as a Swift package using BoltFFI
package:
    cd ../shared && boltffi pack apple

# rebuilds the Xcode project from project.yml
generate-project:
    xcodegen

# generates types, builds shared package, and regenerates Xcode project
generate: typegen package generate-project

# builds the project (generates first)
build: generate
    xcodebuild \
        -project CounterApp.xcodeproj \
        -scheme CounterApp-macOS \
        -configuration Debug \
        build

# local development workflow
dev: build
The main task is dev which we'll use shortly. It runs build,
which in turn runs typegen, package and generate-project.
typegen will use the codegen CLI we
prepared earlier, and package will use
boltffi pack apple to create a Shared package with the native
library and Swift bindings. That package will be our Swift interface to
the core.
Finally generate-project will run xcodegen to give us an Xcode
project file. They are famously fragile files and difficult to
version control, so generating it from a less arcane source of truth
seems like a good idea (yes, even if that source of truth is YAML).
Here's the project file:
# /apple/project.yml
name: CounterApp
packages:
  Shared:
    path: ./generated/Shared
  App:
    path: ./generated/App
options:
  bundleIdPrefix: com.crux.examples.counter
attributes:
  BuildIndependentTargetsInParallel: true

targetTemplates:
  app:
    type: application
    sources:
      - path: CounterApp
        excludes:
          - "Info-*.plist"
    scheme:
      management:
        shared: true
    dependencies:
      - package: Shared
      - package: App

targets:
  CounterApp-iOS:
    templates: [app]
    platform: iOS
    deploymentTarget: 18.0
    info:
      path: CounterApp/Info-iOS.plist
      properties:
        UISupportedInterfaceOrientations:
          - UIInterfaceOrientationPortrait
          - UIInterfaceOrientationLandscapeLeft
          - UIInterfaceOrientationLandscapeRight
        UILaunchScreen: {}

  CounterApp-macOS:
    templates: [app]
    platform: macOS
    deploymentTarget: "15.0"
    info:
      path: CounterApp/Info-macOS.plist
      properties:
        NSSupportsAutomaticGraphicsSwitching: true
    settings:
      OTHER_LDFLAGS: [-w]
      ENABLE_USER_SCRIPT_SANDBOXING: NO
Nothing too special, other than linking a couple packages and using them as dependencies.
With that, you can run
just dev
Simple - just dev! So what exactly happened?
The core built, including the FFI and the extra CLI binary, which was then called
to generate Swift code, and that was then packaged as a Swift package. You can
look at the generated directory, and you'll see two Swift packages - Shared and App,
just like we asked in project.yml. The Shared package has our app as a static lib and all the
generated FFI code for our FFI bindings, and the App package has the key types we will need.
No need to spend much time in here, but this is all the low-level glue code sorted out. Now we need to actually build some UI and we can run our app.
Building the UI
To add some UI, we need to do three things: wrap the core with a simple Swift interface, build a basic View to give us something to put on screen, and use that view as our main app view.
Wrap the core
The generated code still works with byte buffers, so lets give ourselves a nicer interface for it:
// apple/CounterApp/core.swift
import App
import Foundation
import Shared

@MainActor
class Core: ObservableObject {
    @Published var view: ViewModel

    private var core: CoreFFI

    init() {
        self.core = CoreFFI()
        // swiftlint:disable:next force_try
        self.view = try! .bincodeDeserialize(input: [UInt8](core.view()))
    }

    func update(_ event: Event) {
        // swiftlint:disable:next force_try
        let effects = [UInt8](core.update(data: Data(try! event.bincodeSerialize())))

        // swiftlint:disable:next force_try
        let requests = try! Requests.bincodeDeserialize(input: effects).value
        for request in requests {
            processEffect(request)
        }
    }

    func processEffect(_ request: Request) {
        switch request.effect {
        case .render:
            DispatchQueue.main.async {
                // swiftlint:disable:next force_try
                self.view = try! .bincodeDeserialize(input: [UInt8](self.core.view()))
            }
        }
    }
}
This is mostly just serialization code. But the processEffect method is interesting.
That is where effect execution goes. At the moment the switch statement has a single
lonely case updating the view model whenever the .render variant is requested,
but you can add more in here later, as you expand your Effect type.
Build a basic view
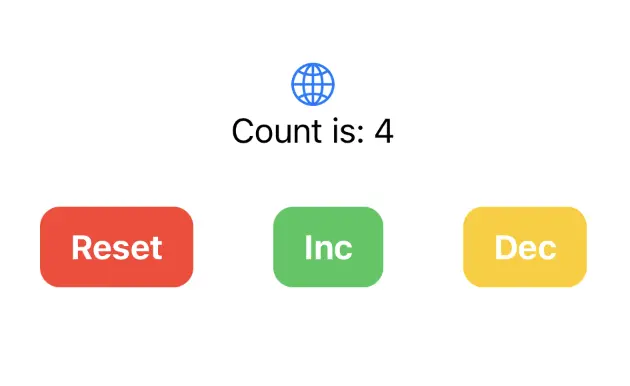
Xcode should've generated a ContentView file for you in apple/CounterApp/ContentView.swift.
Change it to look like this:
import App
import SwiftUI

struct ContentView: View {
    @ObservedObject var core: Core

    var body: some View {
        VStack {
            Image(systemName: "globe")
                .imageScale(.large)
                .foregroundColor(.accentColor)
            Text(core.view.count)
            HStack {
                ActionButton(label: "Reset", color: .red) {
                    core.update(.reset)
                }
                ActionButton(label: "Inc", color: .green) {
                    core.update(.increment)
                }
                ActionButton(label: "Dec", color: .yellow) {
                    core.update(.decrement)
                }
            }
        }
    }
}

struct ActionButton: View {
    var label: String
    var color: Color
    var action: () -> Void

    init(label: String, color: Color, action: @escaping () -> Void) {
        self.label = label
        self.color = color
        self.action = action
    }

    var body: some View {
        Button(action: action) {
            Text(label)
                .fontWeight(.bold)
                .font(.body)
                .padding(EdgeInsets(top: 10, leading: 15, bottom: 10, trailing: 15))
                .background(color)
                .cornerRadius(10)
                .foregroundColor(.white)
                .padding()
        }
    }
}

#Preview {
    ContentView(core: Core())
}
And finally, make sure apple/CounterApp/CounterApp.swift looks like this to use
the ContentView:
import SwiftUI

@main
struct CounterApp: App {
    var body: some Scene {
        WindowGroup {
            ContentView(core: Core())
        }
    }
}
The one interesting part of this is the @ObservedObject var core: Core. Since the Core is
an ObservableObject, we can subscribe to it to refresh our view. And we've marked the view
property as @Published, so whenever we set it, the View will draw.
The view then simply shows the core.view.count in a Text and whenever we press a button, we directly
call core.update() with the appropriate action.