iOS — Swift and SwiftUI — manual setup
These are the steps to set up Xcode to build and run a simple iOS app that calls into a shared core.
We recommend setting up Xcode with XcodeGen as described in the previous section. It is the simplest way to create an Xcode project to build and run a simple iOS app that calls into a shared core. However, if you want to set up Xcode manually then read on.
This walk-through assumes you have already added the shared and shared_types
libraries to your repo — as described in Shared core and types
— and that you have built them using cargo build.
Create an iOS App
The first thing we need to do is create a new iOS app in Xcode.
Let's call the app "SimpleCounter" and select "SwiftUI" for the interface and "Swift" for the language. If you choose to create the app in the root folder of your monorepo, then you might want to rename the folder it creates to "iOS". Your repo's directory structure might now look something like this (some files elided):
.
├── Cargo.lock
├── Cargo.toml
├── iOS
│  ├── SimpleCounter
│  │  ├── ContentView.swift
│  │  └── SimpleCounterApp.swift
│  └── SimpleCounter.xcodeproj
│     └── project.pbxproj
├── shared
│  ├── build.rs
│  ├── Cargo.toml
│  ├── src
│  │  ├── counter.rs
│  │  ├── lib.rs
│  │  └── shared.udl
│  └── uniffi.toml
├── shared_types
│  ├── build.rs
│  ├── Cargo.toml
│  └── src
│     └── lib.rs
└── target
Generate FFI bindings
We want UniFFI to create the Swift bindings and the C headers for our shared
library, and store them in a directory called generated.
To achieve this, we'll associate a script with files that match the pattern
*.udl (this will catch the interface definition file we created earlier), and
then add our shared.udl file to the project.
Note that our shared library generates the uniffi-bindgen binary (as explained
on the page "Shared core and types") that the script relies on, so
make sure you have built it already, using cargo build.
In "Build Rules", add a rule to process files that match the pattern *.udl
with the following script (and also uncheck "Run once per architecture").
#!/bin/bash
set -e

# Skip during indexing phase in XCode 13+
if [ "$ACTION" == "indexbuild" ]; then
   echo "Not building *.udl files during indexing."
   exit 0
fi

# Skip for preview builds
if [ "$ENABLE_PREVIEWS" = "YES" ]; then
   echo "Not building *.udl files during preview builds."
   exit 0
fi

cd "${INPUT_FILE_DIR}/.."
"${BUILD_DIR}/${CONFIGURATION}/uniffi-bindgen" generate "src/${INPUT_FILE_NAME}" --language swift --out-dir "${PROJECT_DIR}/generated"
We'll need to add the following as output files:
$(PROJECT_DIR)/generated/$(INPUT_FILE_BASE).swift
$(PROJECT_DIR)/generated/$(INPUT_FILE_BASE)FFI.h
Now go to the project settings, "Build Phases, Compile Sources", and add /shared/src/shared.udl
using the "add other" button, selecting "Create folder references".
You may also need to go to "Build Settings, User Script Sandboxing" and set this
to No to give the script permission to create files.
Build the project (cmd-B), which will fail, but the above script should run successfully and the "generated" folder should contain the generated Swift types and C header files:
$ ls iOS/generated
shared.swift  sharedFFI.h  sharedFFI.modulemap
Add the bridging header
In "Build Settings", search for "bridging header", and add
generated/sharedFFI.h, for any architecture/SDK, i.e. in both Debug and
Release. If there isn't already a setting for "bridging header" you can add one
(and then delete it) as per
this StackOverflow question
Compile our Rust shared library
When we build our iOS app, we also want to build the Rust core as a static library so that it can be linked into the binary that we're going to ship.
We will use cargo-xcode to generate an
Xcode project for our shared library, which we can add as a sub-project in
Xcode.
Recent changes to cargo-xcode mean that we need to use version <=1.7.0 for
now.
If you don't have this already, you can install it in one of two ways:
-
Globally, with
cargo install --force cargo-xcode --version 1.7.0 -
Locally, using
cargo-run-bin, after ensuring that yourCargo.tomlhas the following lines (see The workspace and library manifests):[workspace.metadata.bin] cargo-xcode = { version = "=1.7.0" }Ensure you have
cargo-run-bin(and optionallycargo-binstall) installed:cargo install cargo-run-bin cargo-binstallThen, in the root of your app:
cargo bin --install # will be faster if `cargo-binstall` is installed
cargo bin --sync-aliases # to use `cargo xcode` instead of `cargo bin xcode`
Let's generate the sub-project:
cargo xcode
This generates an Xcode project for each crate in the workspace, but we're only
interested in the one it creates in the shared directory. Don't open this
generated project yet.
Using Finder, drag the shared/shared.xcodeproj folder under the Xcode project
root.
Then, in the "Build Phases, Link Binary with Libraries" section, add the
libshared_static.a library (you should be able to navigate to it as
Workspace -> shared -> libshared_static.a)
Add the Shared Types
Using Finder, drag the shared_types/generated/swift/SharedTypes folder under
the Xcode project root.
Then, in the "Build Phases, Link Binary with Libraries" section, add the
SharedTypes library (you should be able to navigate to it as
Workspace -> SharedTypes -> SharedTypes)
Create some UI and run in the Simulator, or on an iPhone
There is slightly more advanced example of an iOS app in the Crux repository.
However, we will use the
simple counter example,
which has shared and shared_types libraries that will work with the
following example code.
Simple counter example
A simple app that increments, decrements and resets a counter.
Wrap the core to support capabilities
First, let's add some boilerplate code to wrap our core and handle the
capabilities that we are using. For this example, we only need to support the
Render capability, which triggers a render of the UI.
This code that wraps the core only needs to be written once — it only grows when we need to support additional capabilities.
Edit iOS/SimpleCounter/core.swift to look like the following. This code sends
our (UI-generated) events to the core, and handles any effects that the core
asks for. In this simple example, we aren't calling any HTTP APIs or handling
any side effects other than rendering the UI, so we just handle this render
effect by updating the published view model from the core.
import Foundation
import SharedTypes

@MainActor
class Core: ObservableObject {
    @Published var view: ViewModel

    init() {
        self.view = try! .bincodeDeserialize(input: [UInt8](SimpleCounter.view()))
    }

    func update(_ event: Event) {
        let effects = [UInt8](processEvent(Data(try! event.bincodeSerialize())))

        let requests: [Request] = try! .bincodeDeserialize(input: effects)
        for request in requests {
            processEffect(request)
        }
    }

    func processEffect(_ request: Request) {
        switch request.effect {
        case .render:
            view = try! .bincodeDeserialize(input: [UInt8](SimpleCounter.view()))
        }
    }
}
That switch statement, above, is where you would handle any other effects that
your core might ask for. For example, if your core needs to make an HTTP
request, you would handle that here. To see an example of this, take a look at
the
counter example
in the Crux repository.
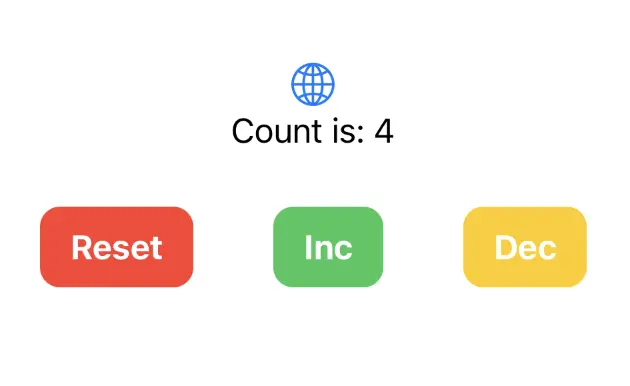
Edit iOS/SimpleCounter/ContentView.swift to look like the following:
import SharedTypes
import SwiftUI

struct ContentView: View {
    @ObservedObject var core: Core

    var body: some View {
        VStack {
            Image(systemName: "globe")
                .imageScale(.large)
                .foregroundColor(.accentColor)
            Text(core.view.count)
            HStack {
                ActionButton(label: "Reset", color: .red) {
                    core.update(.reset)
                }
                ActionButton(label: "Inc", color: .green) {
                    core.update(.increment)
                }
                ActionButton(label: "Dec", color: .yellow) {
                    core.update(.decrement)
                }
            }
        }
    }
}

struct ActionButton: View {
    var label: String
    var color: Color
    var action: () -> Void

    init(label: String, color: Color, action: @escaping () -> Void) {
        self.label = label
        self.color = color
        self.action = action
    }

    var body: some View {
        Button(action: action) {
            Text(label)
                .fontWeight(.bold)
                .font(.body)
                .padding(EdgeInsets(top: 10, leading: 15, bottom: 10, trailing: 15))
                .background(color)
                .cornerRadius(10)
                .foregroundColor(.white)
                .padding()
        }
    }
}

struct ContentView_Previews: PreviewProvider {
    static var previews: some View {
        ContentView(core: Core())
    }
}
And create iOS/SimpleCounter/SimpleCounterApp.swift to look like this:
import SwiftUI

@main
struct SimpleCounterApp: App {
    var body: some Scene {
        WindowGroup {
            ContentView(core: Core())
        }
    }
}